

 |
| Introduction and Overview | ||
Here is a quick overview of what to expect: Step 1 - Register on the Forum: This is free and with no obligations. This "connects you to the RTMM community and RTMM Team that can help you through the setup process. Also, by registering, your "membership" gives you access to download Tongass X (FREE!) from RTMM. Register on the forum HERE. Tongass X is a critical part of the RTMM Scenery Package. Once you download it from the forum link, follow the instructions and install it. Step 2 - Know the software requirements. You must have Flight Simulator X (FSX) or Prepar3D (P3D). You may not want to fly all of the RTMM areas, but once you decide on the areas you want to fly, you will have to purchase the software for that area, the ORBX or Tongass X software packages you choose should be installed first before installing RTMM items.
Step 3 - If you are going to install scenery by the traditional, you must install the necessary object libraries for RTMM, object library table is HERE. If you use the RTMM EXPRESS method of installation, the libraries are all included. We have converted over 6000 objects so they will work with FSX, DX10 and P3D (all versions). All of the objects you see, cabins, campfires, buildings, are in these libraries. Step 4- You must make sure of your folder structure before downloading (so downloads can be put in the correct placement. Also your sim's Scenery Library must be set up in the order necessary for all of this to work. The step tables below are step by step instructions on how to do these tasks. Read the instructions for the task, then follow them precisely. And do not forget ... help is a "click" away ... The RTMM Forum. |
||
| Back to Top | ||

| Step Table #1 - Folder Naming and Placement per Sim Platform | ||
There are many ways you can set up your sim for handling 3rd party Addons like RTMM. However, we recommend the following folder structure. This will help us help you if/when you run into problems, we will be talking about the same structure and the same folder names. ______________________________________________ For Microsoft FSX Folders and sub folders placement and naming (FSX Folder Additions to be added) ______________________________________________ For Prepar3d V3.4 and Prepar3d V4+ Recommended example structure below:
NOTAM! As you add scenery locations - DO NOT COMBINE LOCATIONS INTO A SINGLE SCENERY FOLDER! |
||
| Back to Top | ||
| Step Table #2 - TRADITIONAL ONLY - Object Library Installation | ||
You must install the necessary object libraries for RTMM. These are all included with the RTMM EXPRESS download procedure. We have converted over 6000 objects so they will work with FSX, DX10 and P3D (all versions). All of the objects you see, cabins, campfires, buildings, are in these libraries. These are free to download, but we do as that you do not distribute them. If you are using the TRADITIONAL method of addition, the full instructions and download links are on the Object Library Page of RTMM ... you can see the object libraries you will be installing looking at the Object Libraries table. The object libraries are at the heart of RTMM scenery. These hold all of the objects that we “place” into the RTMM Scenery locations. Many of these have been re-engineered so the objects there will fit FSX, P3D 3 and P3D 4. You must have these installed, or you will see a blackened area where an object should be. 1. Go to the Object Libraries Table ... on the RTMM Object Libraries Page
|
||
| Back to Top | ||
| Step Table #3 - The Scenery Object Tester | ||
The Scenery Object Tester - This tool makes sure all of your object libraries are installed properly. Click on the zip button at the bottom of this table. A "zipped folder" is downloaded to you. Installation: Open the zipped folder you will find a folder marked "RTMM Scenery Object Tester." Copy and paste that folder into your Addon Scenery/RTMM Misty Moorings folder. (See Step 1) This is where you just placed Misty's Place in Step #3. Activate: Now "activate" the Scenery Object Tester just as you activated Misty's Place. Go to your Scenery Library in the simulator and "add". Using the Scenery Object Tester: Once installed, you must go to the location for the Scenery Object Tester, two methods, read both then choose one.
... or ...
Now go to the Scenery Object Tester table on the Object Library Page. Compare the picture there with what you are seeing in the sim. Slew left and right to make sure all the objects are showing exactly as they are shown in the picture. If you see an object that is black, or a missing space where an object should be, then you have made an error in your installation of the Object Libraries. Look at the number for the missing or blacked-out object. Look at the list below the picture and find the number for what you are missing. That will tell you which library you need to re-install. NOTAM: If you continue to have problems with this, go to the TROUBLESHOOTING area of the forum and we will be there to help you solve the problem. If they are all there in colors, then you are ready to move on.
NOTAM: At this point, you should begin checking your scenery library ORDER (see Step Table 8) and adjusting it to keep the Scenery layers correctly adjusted. |
||
| Back to Top | ||
| Step Table #4 - TRADITIONAL ONLY -Adding RTMM Scenery Locations | ||
If you use the RTMM EXPRESS method of downloading, you can skip this. The information in this table is only for people adding scenery in the traditional (one at a time) fashion. Adding an RTMM Scenery Location: RTMM README Files ... To begin, all RTMM Scenery Locations come with a "readme" file that explains any particulars for installing any location you download from the scenery page. But what follows is an example of an installation procedure. We will first add "Misty's Place" to your sim's scenery library. Go to the RTMM Scenery Page. Now click on "M" in the alphabetical row of letters. The page jumps down to the "M" table. Now scroll down to see Misty's Place. Misty's Place is RTMM's "hang out" ... its a virtual bar and grill with a little runway, not far from Ketchikan. At the top of the entry is information on the location, who created it, when it was last updated, it's location, its ICAO code (PF20) and a discussion about the scenery. At the bottom of the Misty's Place section, you'll find several buttons. If you click on the MAP button, you'll get a map showing you the rough position of Misty's Place (so you can see where it is located). If you click on the "S" button you can add sounds for Misty's Place (most people do not use this). There is also a "How to Install" button. clicking that button brings you to this page. The zip button to the left contains the Misty's Place folder. Click on it to download the zip file. Open the zip. You will find a Misty's Place folder (a "scenery" file is inside it). Copy the Misty's Place folder and paste it into your RTMM Misty Moorings folder (see step 1) Now open the flight simulator. Go to your Scenery Library and "ADD" the Misty's Place Scenery. This "activates" the scenery in your sim. For FSX ...............Add the special trick here For P3D, when you click on add, you then browse to the Misty's Place folder, and click on "scenery" that is in its sub folder. This adds Misty's Place to your sim's Scenery Library. This is the procedure you follow for adding EACH RTMM location. To figure out which location to select next, go to Step Table #5 for a discussion on selecting scenery locations. NOTAM: There is no need yet to check out Misty's Place until you complete Step #4 because you may have some object library problems that the next section will fix for you. NOTAM: At this point, you should re-check your scenery library ORDER (see Step Table 8) and adjusting it to keep the Scenery layers correctly adjusted. Time to take a break, you've earned it. Turn on your sim, do a "GO TO AIRPORT" for Misty's Place or PF20. You should find yourself on the runway at Misty's Place. Slew around and get acquainted with your new home away from home! and ... Welcome home! |
||
| Back to Top | ||
| Step Table #5 - Tongass X Installation for P3D | ||
FSX Installation of Tongass X
Traditional (not Express) P3D Installation of Tongass X
Norm's Method:
NOTAM: At this point, you should re-check your scenery library ORDER (see Step Table 8) and adjusting it to keep the Scenery layers correctly adjusted. |
||
| Back to Top | ||
| Step Table #6 - Season Switcher Addition | ||
Option A - The new RTMM Enhanced Season Switcher (RTMM ESwitcher) with "flight date" seasonal accuracy : Many of our RTMM locations have the capability to "switch seasons". So if it is wintertime, you will see winter objects, if you choose summer, summer objects. Any RTMM scenery location that has this capability is marked with the Season Switcher Logo (to the right). You can also choose "No Season" for a more generic look that will work in all seasons. Sporting a user friendly GUI interface, the RTMM ESwitcher can be used to change seasons by flight date or by season. Switching seasons by flight date allows the RTMM ESwitcher to better fit the correct seasonal look taking in to account how each seasonal scenery's specific location might alter the seasonal look by month. Installation: Click on the zip button below to download the RTMM ESwitcher zip folder.
Option B - The old RTMM Season Switcher (does not have the accuracy of flight date switching but can still be used as a basic Season Switcher): Many of our RTMM locations have the capability to "switch seasons". So if it is wintertime, you will see winter objects, if you choose summer, summer objects. Any RTMM scenery location that has this capability is marked with the Season Switcher Logo (to the right). You can also choose "No Season" for a more generic look that will work in all seasons. (Note: at certain times of the year the seasonal scenery foliage etc. may not be an exact match to the surrounding flight sim environment due to location-specific seasonal variation) Installation: Click on the zip button below to download the old RTMM Season Switcher zip folder.
Inside the zipped folder you will find three files: 1. Readme First (our standard readme for RTMM) 2. RTMM Season Switcher V3.3 Readme ... explanation of the Season Switcher by Rod Jackson 3. RTMM Season Switcher v3.3.exe ... the executable file that makes it all work! Read #2 thoroughly. Place the RTMM Season Switcher V3.3.exe file in your Addon Scenery\RTMM Misty Moorings folder with the other RTMM scenery locations. Right click on it and create a short cut for it then copy/paste the shortcut onto your computer's desktop. Changing the Seasons: OUTSIDE of your flight simulator (with it NOT TURNED ON), click on the Season Switcher shortcut you just made. A "DOS" (black table) comes up and you select the season you want. Once you click on it, nearly instantaneously, all of the locations that are season-switcher capable, change to that season. They will remain that way until you run the Season Switcher again and change it to something else. That is all there is to it! A more detailed description can be found on the FAQ page under "S". NOTAM: At this point, you should re-check your scenery library ORDER (see Step Table 8) and adjusting it to keep the Scenery layers correctly adjusted. |
||
| Back to Top | ||
 The RTMM Season Switcher:
 | Step Table #7 - Selecting your Next RTMM Locations | ||
The most difficult part of installation is now behind you. From here forward, it is nothing but discover, fun and real amazement at the absolute beauty of the RTMM area. 1. What ORBX/Tongass X software do you have?
2. Selecting INDIVIDUAL LOCATIONS:
|
||
| Back to Top | ||
| Step Table #8 - Scenery Library Order | ||
Scenery Library Order - The order of items in your Scenery Library is CRITICAL. Certain groups must be in exactly the correct position or the simulator will not display scenery correctly. Think of the Scenery Library as "layers" like on a cake, with the top layer being the "icing". The most basic layers of the cake are below. Here is the recommended order for LAYERS of groups:
NOTAM: In your sim's Scenery Library area, move things up and down to conform to the above “layers”. ______________________________________________________________________ | ||
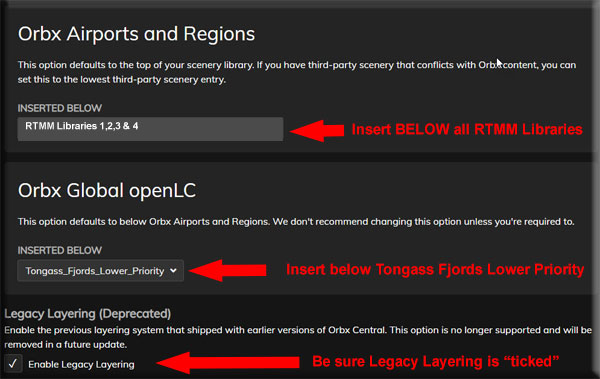
The "ORBX Central" Tool from ORBX will "insert" the FTX files into your scenery library automatically, but you must tell it WHERE to insert the files, the tool "defaults" putting FTX at the top which will not work properly. (Also, now and then, for unknown reasons, ORBX Central will reset the insertion point to the default putting FTX at the top of your scenery library ... this causes you to see no RTMM locations on the ground). To set the insertion point:
NOTAM: Any mesh, (freemesh X etc.. goes right above 1107 bast.. and below the 5 vector entries. (the vector entries should be just below Africa) |
||
| Back to Top | ||
| Step Table #9 - Special Installations for Prepar3d V4+ | ||
If you have P3D V4+ ... you will be encountering some real differences between the old 32 bit platform and the new 64 bit platform. So there are some special things you will have to do to run RTMM correctly in P3D V4. AI Traffic Installations for P3D V4+ There are some AI traffic objects that, when called up by P3D V4+, causes a CTD(Crash to Desktop). Any time your system was "virtually pointed at" one of the older FS9 objects, it would crash. This was difficult to repeat with the AI Aircraft flying around and not consistent. But a consistent CTD was noted for AI boat traffic that was in a certain direction from you. This "directional CTD" is caused by your aircraft pointing toward, then trying to load an FS9 object. To solve this, these objects have been re-rendered to be stable with P3D V4. Download and install these changes: AI Aircraft for Tongass X - Download this folder and follow the instructions in the PDF that is enclosed. This will stop the random CTD's. Notam: It is only necessary to install this in P3D V4. (V3.4 and FSX are not affected). Next, go to Table #10 and look for new files for P3D ... Red are Must Add, Green are Optional. |
||
| Back to Top | ||
| Step Table #10 - New (Site-Wide) Generic Updated Files | ||
As we push the digital frontier, we are coming up with new and better files for the sims we are using. Since these can be used across any/all scenery locations, we've decided to give these important, but orphan, files a home here. Check with this table often for any newly updated files. Green Text - Optional but important
These files are updated on a regular basis ...
|
||
| Back to Top | ||
| Step Table #11 - Multiplayer Information for MFRC and RTMM | |
CONNECTING WITH OTHER RTMM/MFC FLYERS: Many users of RTMM enjoy "MultiPlayer" experiences. RTMM is directly associated with the Misty Flying Club (MFC) and people who are using RTMM can fly with others using the MultiPlayer setups below. To download the necessary software, click on the appropriate logo below. |
|
| COMMS: TeamSpeak 3 >> https://www.teamspeak.com/en/ Server >> ts3digitalthemepark.com Channel >> Flight Division/Aviation Groups & Clubs/WFT- We Fly Together/MFC Misty Flying Club-RTMM |
|
| COMMS: Discord >> https://discord.com/ Server: Misty Flying Club >>https://discord.gg/XvWDbbr |
|
| Multiplayer Client: JoinFS: https://joinfs.net/ Joins: FSX/P3D/X-Plane (all versions as well as MSFS2020. |
|
| Back to Top | |
| Step Table #12 - The Automated Dispatches | ||
The Automated Dispatches RTMM Automated Dispatches use the RTMM Dispatch Selector and works for only RTMM Medical Facilities and BWEP. You can download a single "zip" file that has BOTH Medical and BWEP in the folder, it is the "RTMM Automated Dispatches.zip" folder which is found below. NOTAM, this file is DATED, make sure you have the latest. You place the "RTMM Automated Dispatches" folder into your sim's Scenery Library and activate it like you do a normal scenery location. You then create a shortcut to the "RTMM Dispatch Selector.exe" found in your new RTMM Automated Dispatches/Scenery/ folder. You run this short program OUTSIDE of the flight sim (when the sim is not running). It lets you select which dispatches you want to fly, you can turn them on and off with this program. Automated Dispatch Selector Readme is HERE. NOTAM: All of the Medical and BWEP dispatches are INSIDE the RTMM Automated Dispatch Selector.
For Medical Dispatches: Installation Instruction are HERE For BWEP Dispatches: Installation Instructions are HERE
|
||
| Back to Index | ||