

| Frequently Asked Questions - FAQ |
| A B C D E F G H I J K L M N O P Q R S T U V W X Y Z |
Remember: You can use CTRL-F (Win) or CMD-F (Apple) and ADD what you are seeking in the "find box" |
| A | |
Aerosoft Beaver Conversion to P3D |
When you open your Aerosoft Beaver in P3D ... there are gauges missing under the throttle area. Here is how to fix this problem. Aerosoft Beaver update for P3D-4
To Add the Cockpit Sounds:
|
| Back to Top | |
| B | |||||
Black Rectangle Problem in P3D |
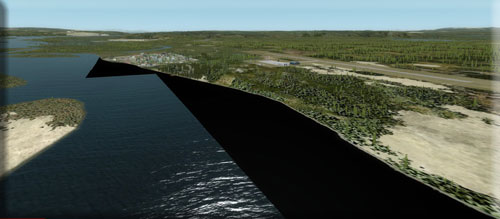
Search Tag Words: Black Rectangle Square Frozen Ice water Vector This is for P3D ONLY! (This does not happen in FSX) If you have TURNED OFF the "Water Freezes in Winter" option in the Vector Configurations, you will, of course, not be showing ice in the winter time. You will notice, in some instances, especially in BWEP northern areas, there is no shoreline or "edge" of the land meeting the water. Basically, the shoreline has been purposely TAKEN OUT of those areas by ORBX. The reason is, there seems to be an incompatibility between ORBX and P3D when it comes to the shoreline and freezing. If you put a shoreline into such an area, as we did with Circle City Lodge, the ice will show nicely with the manually added shoreline, but when water is present, you will see black rectangles along the shoreline. At RTMM, we will not be putting in manual shorelines where they are missing, for that reason. Here is what the problem looks like:
You can solve the problem by looking into the scenery file for that location and take out the "bgl" indicating there is a shoreline by changing ".bgl" to ".off". The other way is to uncheck the "Water is frozen in winter" option for Vector in FTX Central. You will no longer have ice in winter, but you will also no longer have the black rectangles. |
||||
Backup Files for P3D |
If you want to backup your critical files for P3D ... these are the ones you should focus upon: %PROGRAMDATA%\Lockheed Martin\Prepar3D v4 - Scenery Config File (Thanks Rod Jackson) |
||||
Boating Tools |
The the following are "tools" for adjusting the boats and ship. ALWAYS back up your files before making any of these changes. Reverse: These must be added to the Aircraft.cfg file (Hold F2 to Reverse a Boat)
Speed Setting - Making an autothrottle speed setting work correctly:
Speed and Power - To increase your boat's speed and power, increase the power scaler and or the thrust scaler by .1 or a little more.
|
||||
| Back to Top | |||||
| C | |
| Back to Top | |
| D | |
Developer's Guide by Rod Jackson |
RTMM Scenery Developer Guide for FSXP3D Scenery Readiness 6-18-14 Download the full User's Guide HERE Summary Now that we have the FSXP3D libraries done, the RTMM developers will need to focus on revising their various sceneries to be perfect fits with the new libraries. This document provides guidelines to follow a comprehensive process during that effort so that we don't miss anything. In addition, this document has a long Appendix that documents how to make a working windsock that is native to FSX and will also work in P3D. Revising a scenery (especially complicated ones with lots of .bgls) is not simply looking at it in P3Dv2 and seeing what isn't there. The problem is, you don't remember what isn't there. In addition, you will be very surprised at how many other libraries, we, the RTMM developers, have “accidentally” used objects from. That is one of the reasons why all of our libraries now carry the FSXP3D header. It is critical that, when reviewing each of your sceneries, you need to do some real detective work to fix them and be fully synced with our new libraries and the need to make sure that all of our users can see all of our placed objects. The good news is that Instant Scenery 2 & 3 have great tools to let the computer help you do this. Here is my advice on how to use them below. There are probably 3 major issues that the developers will spend most of their time fixing during this effort: 1. Replacing the missing conditional animation objects. There are none to be had because the FSX engine does not support conditional animation. 2. Identifying and replacing all objects that are from libraries that aren’t part of our validated RTMM objects world. That world is:
|
Dispatcher's Ribbon  |
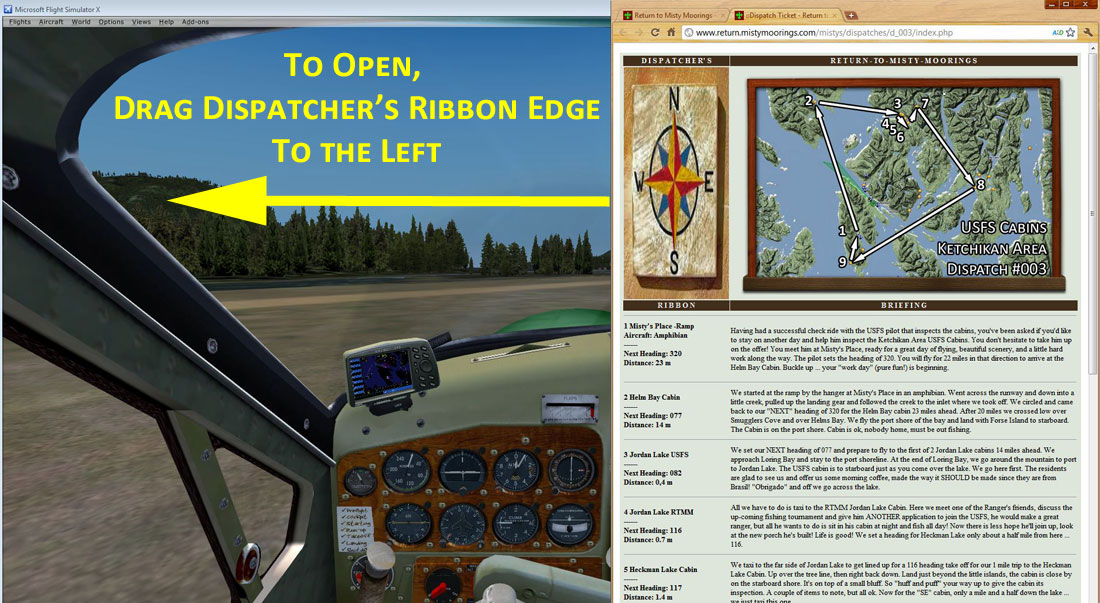
Dispatcher's Ribbon - How to Use When you open a dispatch, you will see a full web page, and at first it doesn't make a lot of sense. But here's what you do. Go to the upper right corner of your browser and click on the little square (not the "-" and not the "x". Then resize your window from the left edge pulling to right so only the Dispatcher's Ribbon is showing ... to the right of your desktop. Move this window to the right edge of your screen and adjust it as you see below.
Click Image to Enlarge Now you resize your flight simulator window placing it as you see above. You are not "cutting off" any of the screen. Most of the time you will be able to just use the headings depicted on the ribbon to help you navigate the dispatch. But if you need the map or would like some commentary on the leg, perhaps some navigational tips, then you grab the left edge of the Dispatcher's Ribbon with your curser and drag it to the left over the Flight Sim screen ... read what you want, check your map, then drag that edge back to hide the map and comments.
Click Image to Enlarge NOTAM: At the bottom of the briefing is a table that gives you the scenery locations that you will need to fly the route correctly. This is a good way to make sure you are caught up on the latest scenery locations and also a great way for a new-comer to begin adding locations from RTMM. How to add a Dispatch - What I need: We will be adding more dispatches to the Misty's Place Dispatcher's Office in the future. If you have one you'd like to submit, You will need to send us the information that you see on a dispatch ticket ... the left column, and the storyline. Don't worry about the map, if they are RTMM or PFJ locations, I have them and can make the map. Remember some people will need some "help" finding things, so be sure to add some of the helpful navigational hints to your commentary. (If folks get lost, it is not fun for them). Be sure to list the things people will need to fly the route. (Again many newcomers may not have all the scenery locations, so this gives them a chance to know what to download and eventually they'll be caught up). Send any COMPLETED routes to Doug at rtmm@jdlinn.com ... and I'll take a look at them. |
| Back to Top | |

| E | |
| Back to Top |
| F | |
FSX-P3D Libraries
SEE NOTAM BELOW
The Red and Green NOTAM ==-------> |
RTMM engaged in a major internal project to make all of our scenery locations compatible with FSX, FSXDX10 and Prepar3D.
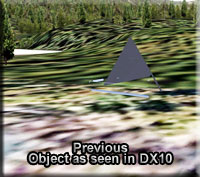
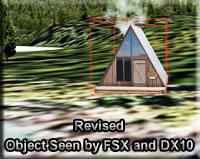
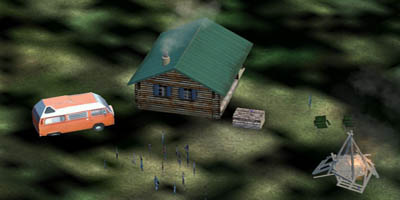
Go to the Objects Library Page. There you will find the libraries that you must download. Follow the instructions carefully. Once, you have installed the Part I, Part II, Part III and Part IIII of the RTMM Required Object Libraries FSXP3D, we have devised a Scenery Object Tester that will help you determine if you have all the object libraries you need or whether you may be missing one or more. Often, objects with missing textures have been replaced with objects that can be seen in DX10. The placement of the object is the same as in the original file so as not to interfere with the integrity of the person's work that went into creating the scenery location. If you are using DX10, all you do is click on the "zip" button and download the new scenery folder, copy the new scenery folder and replace old one in your scenery file. The names of the bgl's in the folder are not changed, just one or two objects are changed. A list of the changed sceneries are being kept on the Forum under the FSXP3D Libraries Discussion Thread.
The above screenshots tell the story. On the left you can see only a partial roof and parts of the foundation of the cabin. If you are using FSX without DX10, you see the whole cabin fine, but in DX10, textures are missing. What I do is take out the "old" object and replace it with a similar object that shows up for users both with or without DX10. The integrity of the location is intact, but both systems can view the object clearly now. This is what we mean by making the location "DX10-Ready". If a location shows all objects properly, we change nothing, just certify it as DX10-Ready. Where we know we have a missing object for DX10, you will see a "DX10 NOTAM:" under the zip button ... this tells us we have to come back and repair it. This is an on-going process so we will repair them as we get to them. If you are NOT using DX10 or P3d, there is NO NEED to download any of these revised files ... you will not see a difference. Perhaps a picnic table is a little different color, or an outhouse may have an open door. Downloading any of these revisions will not enhance your FSX experience. NOTAM - RED/GREEN Lights Post-Library Conversion Quality Control Beginning - On our scenery page, you will notice a FSX/DX10/P3D logo to the right of each scenery location. You will also see a red light or a green light there. We are beginning our final pass on all of the scenery locations making sure all of the objects are viable in each location (we had check them in the libraries, but now we are looking at them in their actual position). As we work our way through the many locations we have on the scenery page, you'll start seeing the red lights turn green. We are pretty sure that ALL scenery locations are working fine, but this is our own way of making sure for you. As we look at each location, we are also looking at the folder and file structure on the server making sure it is error-free. When a major one "turns green" we will post it here so you'll be sure to know about the latest update. |
Frame Test
|
Problem: Slow Frame Rates at some CIRP locations Possible Causes: 1. Smoking Barrels We do not know what might be causing the slow frame rates (even on high end computers) so we are, possibility by possibility, trying to find the problem. It has been suggested the smoke may be the problem. To see if this is correct, we are looking now at Summit Ice Station (PF48) The following zip folder holds 4 folders:
BE CAREFUL with these, they all have the SAME name. Download the zip and put the four folders in a safe place. Go to Summit Ice Station in FSX and check your frame rates. Now, exit FSX. Open one of the folders and copy the bgl and paste it over the bgl in your Addon Scenery/PF48 Summit Ice Station/Scenery folder. You want to overwrite the bgl in there. Then start up FSX and take a look at the scenery and see if you have eliminated whatever you wanted to try to eliminate. Check the frame rates (write them down please). Then do it with another folder, etc. We want to see if any or all of these are causing you problems. Please let us know on the forum thread. http://forum.mistymoorings.com/index.php?topic=786.msg5623;boardseen#new
|
Flight Seeing Plan
|
The Flight Seeing Plan generally match the Trip Tic VFR flights. These are "LSD" (Low, Slow and Dangerous) flight plans. If you use a bush aircraft, you can safely use the autopilot that will make all the dangerous turns for you. Different Strokes: We have many people flying Misty that have their own "method" of attack. Some would like only a gps coordinate and a sturdy plane. Others want a rough map, but want to "find their own way." Others want to "learn" the area geographical way point by way point, learning the turns. Yet others would just like to sit back, let the "pilot" fly the plane and hear stories about what they are seeing below ... in Alaska, they call them "tourists." We have tried to give everyone the experience they want. Some folks like to fly with a "split" screen, Trip Tic to the side, others want the full screen, Trip Tic printed to follow. Solutions: On the Trip Ticket, the GPS location is there. On the scenery page, a rough map can pop up so people can see "roughly" where they are going Reading through the Trip Tic and flying VFR is a great way to learn the area. And then, with autopilot on, others can sit back, let the "virtual pilot" do his job and read along on the Trip Tic to know what they are seeing. You can split your window and read the Trip Tic, or you can click on the "Print-Able" copy and use that instead. There's something here for everybody and every skill level and every mode. Flight Seeing Mode - Bring up the Trip Tic in a side window. Let the computer fly the plane while you read the Trip Tic and enjoy the sights, just like a tourist would. You have to take off and land, but the rest is done by the autopilot. You only have to set altitude, usually once during the trip (except for landings). If you would like to see what "flight-seeing" is really like, click on this VIDEO link. Notice the "ceiling" ... covering the tops of the low mountains. This is why I set up the FS plans for 1200 feet. You fly "below" that ceiling which is there more often than not. VFR Mode - This is when you want to be the pilot. You use the Flight Seeing flight plan, but you fly the plane based on the Trip Tic, watching the GPS for turns. |
FLOATING OBJECTS FIX |
Occasionally you will see floating objects. The issue has to do with how FSX loads terrain mesh in the mid to far distance. For some reason, and usually in specific locations, the sim places a group of houses above the surface instead of onto it. The only way to completely fix it would be to replace the autogen with custom buildings for that location. Not sure if that's what Brad did in Skagway as I never tried his fix.
This discussion is from Holger Sandmann.
|
Fuel Pump Trigger "How to" |
If you want to add a "fuel station" or a "working fuel pump" (the invisible box, that if entered by a vehicle, fills up the fuel tank), here is how to make it happen. This was created by Rod Jackson. Download the "how to here . (Note there is a more in depth discussion (compiling the bgl) on xml under "D" for RTMM Developer Guide.
|
| Back to Top | |
 - - - - -

| G | |
| GPS 500 Tutorials | Here is a very basic tutorial on how to operate the GPS 500 that is found on many FSX and P3D aircraft. You can download it HERE. For in depth information on how to use the GPS 500, it is recommended that you visit YouTube HERE. This video gives you detailed information on using the GPS 500. (08.24.2016) |
| GPS Software Update | Here is some new software for your Garmin GPS on your aircraft. Click on the zip to download. All you do is rename your fs9gps.cab in your gauges folder to fs9gps.cab.old .... then put in this new fs9gps.cab in its place. That is ALL there is to it (I even got it right the first time!).
|
| GPS Waypoint Addition | Some of our packages come with GPS waypoints. To add these to your GPS, do the following:
|
| Back to Top | |
| H | |
"HOW TO" Section Below are a collection of tutorials and notes we thought would be interesting to "archive" so others could use them too. Many of us struggle through a new process, learn how to use it, then forget to "document" how we learned it and are using it so others could try it too. So this area will be dedicated to "How to..." |
|
| AI Boat Traffic |
|
| Flat Polygons | |
| S-Builder Water Polygons | |
| Sloped Polygons | |
| Back to Top | |
| I | |
Installation
For Misty Moorings Scenery Files
|
INSTALLATION INSTRUCTIONS For RETURN TO MISTY MOORINGS sceneries
NOTAM: Since we have upgraded to Scenery Object Libraries to use our new combined FSXP3D library, many of the installation instructions in the scenery zip files are obsolete. You should follow the instructions below over-riding any instructions that may appear in the zip readme file. (We will be working on fixing these over time) For now, whenever you download a scenery location follow the instructions below: 1. Unzip the file to a temporary folder. In this new folder you may find:
2. Object Libraries: You must already have the correct Object Libraries installed. You can download these from the RTMM Objects Library Page. You can also run the Scenery Object Tester there to make sure you have all of the object libraries loaded correctly.
FSX Add Scenery Bug .... There is a known bug with FSX and Windows 7. It's easy to fix, though. When you try to add an area, hitting OK the 2nd time does not start the database build. Follow the directions you have, all the way up to clicking "OK." When you click OK, you should now be inside the scenery folder (not what you wanted), but there is a workaround). Now, right-click anywhere inside that folder where it is blank. The item should now be added to the scenery library. (Full fix thread HERE.) Example 1. In Settings, LEFT CLICK on the ADD AREA, then 2. Left Click on Addon Scenery (or wherever you put your addon files) 3. Left Double Click the scenery you want 4. In the new window appears, left click OK (nothing happens) 5. Now Left click AGAIN in the blank space of the window. Here's a video from Bill Womack that explains it ... http://iblueyonder.com/video-tutorial-adding-scenery-to-fsx-in-windows-7/ |
| Back to Top | |

| J | |
| Back to Top | |
| K | |
| Back to Top | |
| L | |
Latitude and Longitude with 4 digit accuracy |
Search Words: Latitude, four, 4, digit Under [MAIN] in your simulator's "cfg" file, add this: FractionalLatLonDigits . This will give you higher accuracy latitude and longitude for more exact placement of objects. The CFG File is located under Users/"name"/Apps/Roaming/Lockheed Martin. [Main]FractionalLatLonDigits=4
|
| Back to Top | |
| M | |
Missions |
When you go into FSX Missions, please be sure to select the "Enable Changes" tick box below the missions menu first. Then you can switch aircraft, refuel, etc. before the flight begins.
Load up the mission and once in the cockpit of the default aircraft, hit the "P" key immediately to pause the mission. Then load your preferred aircraft. The default aircraft this mission was designed with was the Maule M7 on ski's, but if you'd prefer something else, now's the time to make that choice. Before you unpause, check the fuel levels in the aircraft you decide to fly this mission in. The tanks should have enough fuel to complete this mission but might be uneven and if so, you'll need to balance them out. Once you're done with that, then you can hit the "P" key again and start the mission. This is an IFR mission and I created this with bad weather and low visibility conditions. You can challenge yourself to see how you do. The flightplan is NOT an IFR plan though, so you'll have to rely on the mission compass. Let's discuss that feature. Use the "U" key on your keyboard to cycle the mission compass on/off. You can also have a large green rotating arrow pointer floating in the air ahead of you if you like. Just cycle the "U" key once you take off and get a heading for your first waypoints Use the mission compass on all of your headings. Try not to just hit the autopilot. The waypoints designed in this mission may not be right along the GPS flight plan so you'll have to deviate from that. When you get a mission compass heading, you can determine by looking at the GPS flight plan and seeing how far off course that will take you. But fly towards the mission compass heading only if the surrounding terrain can be safely crossed. Once you hit your mission compass waypoints, cycle back to the GPS and see where you are in relation to the flight plan again. Just use the GPS as a back up. Remember, you're the pilot in command. I designed this mission to fly no higher than 6000 feet, but you can skim the deck if the clouds are too low and the sweet spot so you can see the sights during your cruise portion is at around 1500 ft. So remember, you will have a VFR flight plan available on your GPS in the aircraft. You can use that as a back up to the mission compass that will appear at various times throughout the mission to help you navigate through the flight. If you would like to also see captions of the voice messages during the mission, make sure you have them selected in FSX. To do this, start up FSX, then click on "Settings" on the main screen. Then on the right hand side of the settings screen, select "General" On the settings general screen, in the "Missions" area on the lower left hand side, make sure the tick box is checked for "Show Captioning" to see the messages as text during the mission. Uncheck this box if you'd prefer to not see the captioning. Then click on "OK" and exit. You should be able to fly this mission using any aircraft you have in your hangar, as long as you think it will land on ice okay!!! The landing zones for this mission are on frozen lakes so prepare accordingly. Once again, just make sure the "Enable Changes" tick box in the FSX main missions screen is selected before you begin the mission. There are no rewards to lose for this mission. Take your time and follow the mission compass and use the GPS as a back up. If you try this mission in a fast aircraft you'll probably not hit the waypoints as designed, voice prompts will be off, etc. No worries. My intentions aren't to reward the pilot with a medal or something like that, just engage the pilot with some information on the area they are flying my mission in. Some landmarks in the mission have information included about them that you may or may not find interesting. I hope it does interest you though and that you enjoy the scenery on this mission with a little more knowledge about it. Glitch note: There are times that a system can crash during the mission. This only happens when you to change something while the mission os underway, like a water resolution or scenery density setting, weather, etc. from the FSX menus. So, my advice is leave your settings as is while you try this mission out and you shouldn't have any problems. |
Mooring Points |
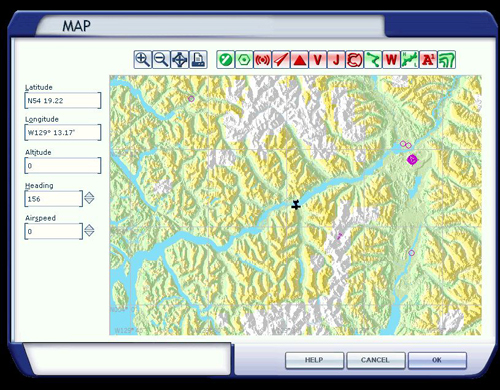
A "Mooring Point" is a starting point and position for an FSX aircraft or boat. If you would like to start at a location, but do not know "where" it is ... you can get there quickly using this procedure. Only "airports' with ICAO codes are going to show up on your GPS. Thank's to Dieter's Plan G updates, you will see all of the RTMM scenery locations in Plan-G. But if you want to position yourself at a scenery location without an ICAO code (most of them!), then this is the procedure to use. Often it is fun to fly "back' from somewhere to an airport, again, this procedure will help you do that. Mooring Points for all RTMM scenery locations can be found at the MAP ROOM. All Mooring Points for the USFS Cabins can be found on THE CABINS page. The data for a mooring point will look like this: N54 19.22 W129 13.17 Heading 156 Altitude 0 Speed 0
In FSX, bring up the MAP VIEW ... then enter the data in similar to below: Note: be sure to use the proper spacing and decimal for each entry.
When you are finished, press the OK button and you will be transported to the correct starting location and will be lined up correctly. |
MultiPlayer Setup |
To set up TeamSpeak and FSHost, go to the Multiplayer Setup Page |
| Back to Top | |
| N | |
| Back to Top | |
| O | |
|
|
|
| Back to Top | |
| P | |
P3D Fix Files |
Beaver.cab for the Aerosoft Beaver Gauge Fix in P3D. Copy the beaver.cab file you now have in the "Standard Wheels/Panel" version and replace it with this cab and the three missing gauges will show up correctly. | Pacific Northwest
|
"RTMM has added several new scenery areas inside this wonderful area of North America and we recommend this region that goes "Beyond Misty". You must have this region to use our "Owikeno Lake" scenery package and our "PNW AI Shipping Project". Hailed as a breakthrough product by many publications, PNW is a "Must Have" scenery package. This is the first award winning North America region ORBX/FTX released and it's now legendary in popularity. You won't be disappointed. |
PFJ
|
"To use Return to Misty Moorings, there are four distinct regions we use in FSX. "Pacific Fjords", "Pacific Northwest" and "Southern Alaska" by ORBX/FTX. "Tongass Fjords X" from FSAddon. Our main focus has been on the ORBX FTX region, "Pacific Fjords" and since the majority of our scenery is designed in this region, that is the where we recommend you start. If you want to see "Misty Fjords" as it "really is"...you will need PFJ as a minimum. To get the most out of RTMM we recommend you also branch out like we did into the nearby regions of Tongass Fjords, Pacific Northwest and Southern Alaska too." |
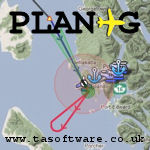
Plan G
|
Plan-G is the software we have selected for our navigation and maps here at Return to Misty Moorings. Here are some of the features included in this FREEware package: We Recommend the latest version of Plan G (found here) All of our maps are made using this software. Also our flight-seeing flight plans are made with it. When a flight plan is made, we upload it to the site using the "pln" file that FSX reads rather than the Plan-G extension. Here is TA Software's information on this fine program ...
|
| Back to Top | |

| Q | |
| Back to Top | |
| R | |
| Required Addons |
Return to Misty Moorings necessary ADDITIONAL Packages ...
* FSAddon Offers a Discount to RTMM Purchasers (See Friends Page Here) NOTAM: Return to Misty Moorings receives NO REMUNERATION from any of these commercial sites. |
Repaints - How to | Generic Instructions from Chris. Open your FSX aircraft folder for this particular download - it will be something like C:\Program Files (x86)\Microsoft Games\Microsoft Flight Simulator X\SimObjects\[the sub-folder name should be inserted here, i.e. \Airplanes or \Rotorcraft] Unzip the contents of this zipfile into this folder. You will now see a new folder called C:\Program Files (x86)\Microsoft Games\Microsoft Flight Simulator X\SimObjects\[Rotorcraft\Bell412_EP\Texture.N911FR - given only as an example - this will need to differ according to the paint] Next open the aircraft.cfg file with any text editor program (Windows editor does the trick) and find the last block of text that starts with a line [fltsim.x] where the x will be a sequential number which starts at flightsim.0 and goes on for as many variants of the model are installed. Copy the last complete fltsim.x block and paste it into the aircraft.cfg below the previous last entry. Example, if the black text below is the last fltsim.x block... [fltsim.1] Then you simply copy and paste that block in below and increment the fltsim.x number. In the example below you can see several lines highlighted. You MUST edit these so that FSX can recognise the fact that it has to display a new plane in the aircraft selection menu. Remember - these lines in red should be unique for each paint you add. The lines below are examples only and will look different for each model. If you really do have problems, drop me an e-mail and I will see if I can help. [fltsim.1] [fltsim.2] Now go flying and have fun |
| Back to Top | |
| S | |
SEASON SWITCHER
Click on ZIP to Download the Season Switcher
|
NOTAM: It is NOT UNUSUAL for you to get a "false positive" trojan alert from your (hopefully) installed malware defender. You can ignore this as this zip has been thoroughly tested and vetted. In can configure your antivirus program to IGNORE this alert. Some ReturnTo Misty Moorings (RTMM) Sceneries include seasonal .bgl files. The RTMM Season Switcher can be used to select the season you wish to be set in all of those seasonal scenery files. In order for the RTMM Season Switcher to make changes to multiple scenery packages automatically, all of the RTMM scenery packages (with the exception of seasonal traffic files) or at least those that you want to be affected by the RTMM Season Switcher, are required to be inside the Microsoft Flight Simulator\Addon Scenery folder. If the RTMM scenery package includes seasonal traffic files, those files will be installed in the Microsoft Flight Simulator\Scenery\World\Scenery folder as always. A typical path for RTMM scenery folders might be: C:\Program Files\Microsoft Games\Microsoft Flight Simulator X\Addon Scenery\Misty Moorings\<RTMMScenery>\scenery For those of you who have v3.2 or earlier of the RTMM Season Switcher, you need to delete the RTMM Season Switcher v3.x.exe from your <Misty Moorings> (or whatever name you use) parent folder. In addition, delete the curseasonset.txt (which is created by the RTMM Season Switcher) file from the same place. Also, delete the RTMM Seasona Switcher shortcut from your desktop. The "RTMM v3.3 Season Switcher.exe" file that is contained in this release folder needs to be copied into the Addon Scenery folder and not your <Misty Moorings> folder like version 3.2 and before. After that, you would make a shortcut of the .exe file and move that shortcut to the desktop. So a typical path for the RTMM Season Switcher v3.3.exe file would be: C:\Program Files\Microsoft Games\Microsoft Flight Simulator X\Addon Scenery\RTMM Season Switcher v3.3.exe When the RTMM Season Switcher is run, the user will be asked to choose a season. There will also be an option for No Season. If "No Season" is chosen or if the RTMM Season Switcher has not been run, the seasonal objects used for the scene will be whatever the scenery developer thought would look best as if there were no seasonal files available. In this way, the user could still enjoy the scenery (albeit not as seasonally integrated as the developer may have wanted) in any season without having to run the RTMM Season Switcher at all. Or in other words, the scenery would operate as if it never had seasonal files. NOTAM: If a location is Season Switcher Capable and you do not use it, you can see "green" trees at the location in "winter" ... this is because "noseason" is used for the universal scenery background. We will be adding Settings Chart for different areas, these can change by location depending upon how far north the location is. Be sure to see the chart that is included in the "readme" for the location. Here is and example for the Lake Louise Lodge: ============================================ Season Switcher Settings for Lake Louise Area FSX/P3D........ RTMM Season The season switcher is set based on the table in the scenery documentation and the month set on your computer. Examples: If your computer is set to October, then for this scenery location, you set the season switcher to "FALL." If your computer is set to November, you would set the Season Switcher to "Winter". ========================================== Additional Information: When you run the RTMM Season Switcher, the program will either create or update a season choice tracking file named curseasonset.txt which will be located in the same folder where the RTMM Season Switcher folder is located which is the FSX Addon Scenery folder. You don't need to do anything with this file other than leave it alone. v3.3 Change Log: Besides seasonal object change, this version now allows seasonal change in terrain redraws, flattens etc. as well as traffic file change that can include AI aircraft and boats. As a result, the RTMM Seasonal Switcher is now located just inside the Addon Scenery folder and must be run when FSX is not running, otherwise the chance of file lockout is very high. In addition, things like traffic cannot be changed without a FSX restart. Season Switcher Duplicate File Error Help! When I start my RTMM Season Switcher it gives me the message: A duplicate file name exists, or the file cannot be found. Then if I do choose a new season, the season switcher gives me this message at the end: The seasonal files have not been changed because FSX has locked some seasonal files. Please exit FSX. Then run the RTMM Season Switcher again and follow the normal procedure to changes seasons. I can't exit FSX or P3D because they are not even running. What do I do? Click on Zip below to Download the Fix Duplicate Seasonal Files folder and follow the readme.txt. Note: Your virus scanner may flag this zip file since it contains an executable command file. WATER FREEZE NOTAM NOTAM: If you are using P3D and with the FTX Central you have TURNED OFF the Vector Feature/Water/Water Freezes in Winter ... you will see no ice. This is as you would expect. But you should know SOME Season Switcher sceneries in RTMM have objects placed on the ice in the wintertime. So with the "Water Freeze in Winter" turned off, you will have those objects "floating" on the water.
RTMM Season Switcher Developer: Rod Jackson (Updated 03.08.2017) |
Scenery -Adding FSX BUG FIX |
There is a bug in FSX that makes it difficult to add scenery to your scenery library. Watch this short video and you will not have a problem with it. |
Scenery Buttons |
Explanation of the buttons on the Scenery Page
|
Scenery Object Tester |
The Scenery Tester is a little application we have made so you can check to see that you have all the libraries that you need for RTMM. You will find the download for it and the explanation of it on the Library Objects Page. |
| Scenery Problems |
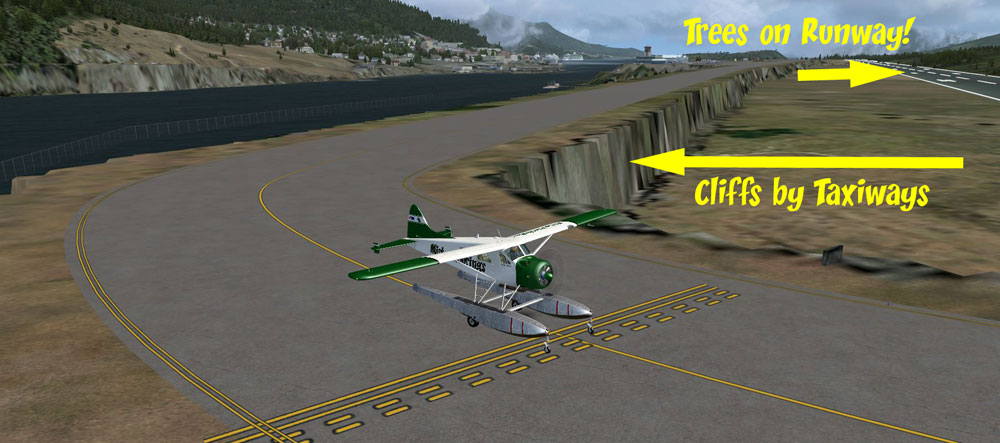
If you see this:
Instead of this:
You can bet your problem is your MESH setting.
If you see THIS ... it is a different problem ...
(Click to enlarge) We don't know why this happens. To solve the problem, go to FTX Central (ORBX Program). Click on Default FSX and "apply". Load FSX ... it will rebuild scenery files. Once it is "up" you will see the problem is probably solved. Now turn off FSX and go back to FTX Central and click on North America and "apply". This should solve the problem.
|
| Scenery Problems Black Textures |
If you see this:
airmail depot.dds, airmail depot_LM.dds, FBO 1.dds, FBO1_LM.dds, FBO 2.dds, FBO 2_LM.dds, FBO 3.dds and FBO 3_LM.dds Go into the EZ Scenery LibraryFSXP3D Texture folder and copy the above .dds files into your FSX\Texture folder and you should be set to go. Rod Jackson |
Scenery Settings |
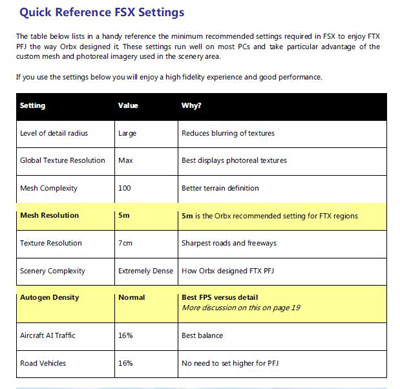
From the PFJ "Manual" here are the setting for Scenery recommended for PFJ.
Best Settings for Prepar3D are found on their Learning Center Page - click HERE |
Sound Files |
These sounds are placed in different areas of the scenery. (From Dex Thomas)
INSTALLATION: In the zip file, you will find a collection of files. There are three types of files. Audio, placement and effects. |
STARTING POINTS Found at: Misty's Place Starting Points Button |
RTMM is about flying from HERE to THERE ... it is about a good place to start, a great trip and a satisfying landing. For Flight Seeing and Boat Trips we often encounter a problem of the Flight Plan having to start at an airport. When we build a remote location, or if an dock is not listed as an airport, then the flight plan cannot "start" you from that point. Example: for the cabins, you fly from PAKT or one of the local airports TO the cabin. But what if you wanted to fly from the cabin to PAKT? You can do this using the Starting Points Table. (Misty's Place / Starting Points button). There you will find a latitude, longitude and heading for every location we have put into RTMM. On the USFS Cabins page, you will also find all of the starting points. Utilizing the Starting Points (FSX MAP FEATURE)
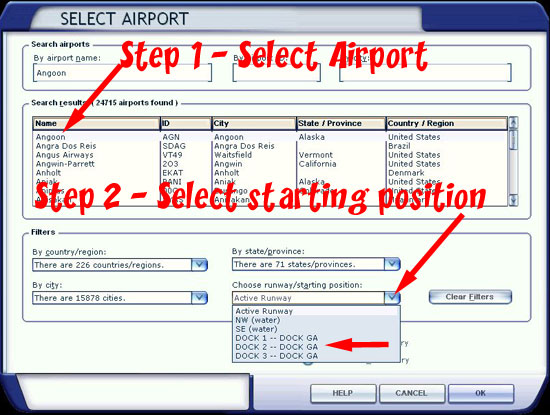
Many of these "unlisted" or "added" locations will be given a flight plan "starting point". When those are present, the flight planner in FSX can START from such a previously unlisted position. When you look at the start table, if there is a "#" sign after the name of the location, this means you will find a "start position" by going to the "WORLD / GO TO AIRPORT" and looking for the name of the "airport". Click on it and you will be transported to that new location. An OFTEN forgotten feature ... and one you should keep in mind ... is that for Sea Plane Bases (SPB's), when you use GO TO AIRPORT, it automatically selects the water runway for you. For example: to choose Angoon, one would typically double click on the word ANGOON ... but if you do, you'll start out in the water. All of us do this and forget there is another step. When you put your curser on Angoon, the line across the table for it is bordered, once bordered, DO NOT CLICK IT AGAIN. Use your first click to "highlight" the selection then without clicking go to the "Choose Runway / Starting Position" table and click and you will find a drop down. Often (for us) these are docks or moorings. Select one of these and click and you are at the dock instead of out on the water a couple of miles from the dock.
For the "UNlisted" docks and starting points, if there is a "#" sign after the name, then that location is in the RTMM_Docks.zip file. This is a scenery folder you can download from the top of the Scenery Points table. You add it like any other scenery (read the readme that comes with it). Once it is activated in your scenery library, then you will be able to find the new location on the "Go to Airport" table above. To have it appear in Plan-G, you simply ask Plan-G to re-accumulate the FSX data. It takes a little while, but now these will also show on your Plan-G maps. You can get the latest RTMM_Docks.zip file by clicking on the icon below. The latest update date for this will show in the brown table above the Starting Points table.
A great deal of work has been done on many of the seaplane bases (especially in Tongass Fjords X). And all too often, we miss them by starting far away out in the water on the "water runways". You get a journey and a location, but you miss a beautiful start. Hopefully, this adds to your "HERE" in the "Here to There" goal we have at RTMM. |
| Back to Top | |
 INSTALLATION INSTRUCTIONS (Note: RTMM Season Switcher executable folder location has changed beginning with v3.3)
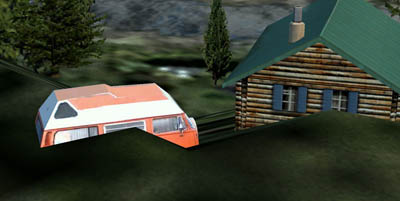


| T | |
|
TeamSpeak
|
The Return to Misty Moorings site will be using TEAMSPEAK for multiplayer operations. To see the full TEAMSPEAK installation procedure by Darryl Wightman. To see the full procedure for setting up this program and also FSHost, , click on the logo below:
|
|
Trip Tics
|
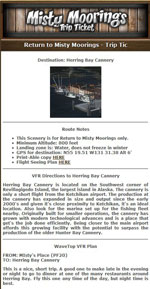
Trip Tics What are they? Trip Tics (tix) are hand-written instructions for getting from point A to point B using the pilot's knowledge of the geography. These are "turn for turn" instructions. With these, you don't fly "over" the scenery ... you fly down "inside" it ... wavetop and treetop! What I would call LSD, "Low, Slow and Dangerous". However, if you want to see Misty up close and need to kick up the heart rate flying through mountain passes and skimming over conifers ... fly a Trip Tic! This is the ultimate VFR experience for Return To Misty Moorings. In the "real" world of bush flying in Misty Fjords, the pilots must ferry people from Ketchikan to the outlying cabins in the fjords. Some destinations are difficult to find even when you know your way. To make it even more interesting, the weather is usually rainy with low overcast. So rather than flying direct, the pilots tend to stay below the cloud ceiling, meaning they must fly around and between mountains. If a pilot goes above the clouds, there is always the danger of finding a mountainside on the way back down through the clouds. So flying close to the water and between the mountains is the safest choice. (It is also the most scenic choice ... both for tourists and flight simmers). I once asked a DHC-2 pilot, while we were flying, how do you know where all these things are? He reached under the seat and pulled out a cigar box. In it were pieces of paper with the name of the destination and "turn by turn" instructions to locate the destination. They were in no order, had some greasy fingerprints on them and were obviously well-used. With the Trip Tics, we've attempted to create that little box of instructions. If one of our addon sceneries has a Trip Tic ... you will see an icon as below. Click on it and you will be reaching into the cigar box and pulling out the VFR instructions you need to find the destination. (Click on any below to see a Trip Ticket Window)
All RTMM Locations comes with a flight plan (pln) file. Some come with a Flight-Seeing Plan. The Trip Ticket will follow that plan. Watch for the button below, again at the location of the scenery on the scenry page. All "FS" plans are "autopilot" friendly. This means if you maintain the altitude (trip ticket leg altitude), the plane will safely fly to the destination on autopilot so you can enjoy the ride and read the narrative in the Trip Ticket.
Using the Trip Tics. Two Procedures or two ways to use them. Procedure 1 - Web Based: When you click on the Trip Tic icon on the Scenery Page where the "location" of the scenery is, a web page comes up with a narrow table. If you are lucky enough to have a wide screen monitor, you make a narrow window of the Trip Tic page, putting it beside the window for your flight sim. That way you can fly but look over at the instructions and scroll them down as you proceed. Here is the process you follow. Bring up the Trip Ticket Window
When you resize, leave a small brown strip of "wood" on each side of the Ticket. If you have a scroll wheel mouse, you can also move the window so the "slider" is not showing.
Resize the Flight Sim Window to mostly cover the Trip Ticket, leaving only the small brown strip of wood to the right (and the slider if you don't have a scroll wheel).
By clicking on the right wooden "edge", the trip ticket is unhidden and you can read it and scroll it. To hide it again, simply click on the Flight Sim Window and it hides again. NOTAM: You may not see the wooden background, that is for the newer Trip Tickets. But resize the window the same way even if you see a different background. Procedure 2 - Hard Copy. The other way is to use the Print-able copy. On the Trip Tic, you'll see it says Print-able copy HERE ... click it and a text file comes up that you can print. Using this method, you can use your whole screen for the flight sim and read along with the printed copy. Listening to the Trip Tics and Dispatches: There are "extensions" you can download (free) for browsers that will "read selected text". One of those is Chrome Speak for Google Chrome ... your browser may have one. When the trip ticket is "up" in the right hand windows, select the text you want "spoken" then right click and select "speak". You can then close the window as the narration is spoken to you. (You may want to hit "Q" to quiet the aircraft sound on your aircraft). You can discuss the Trip Tics on the Return to Misty Forums. |
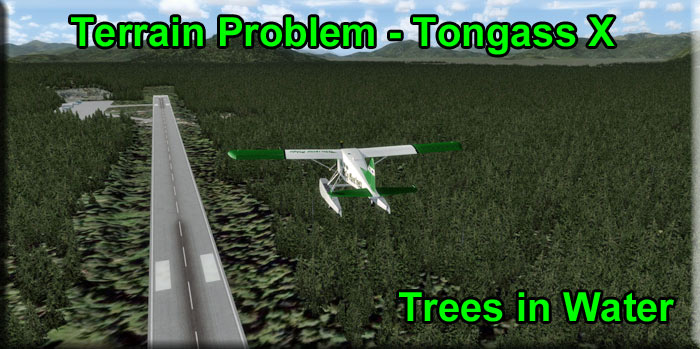
Tongass X Terrain Problem  |
Terrain Problem - Trees in Water - Tongass X Sometimes you will run into a terrain problem (Trees in the water) migrating Tongass X over to Prepar3D. If the problem exists, you will see trees in the water like this at Wrangell (PAWG):
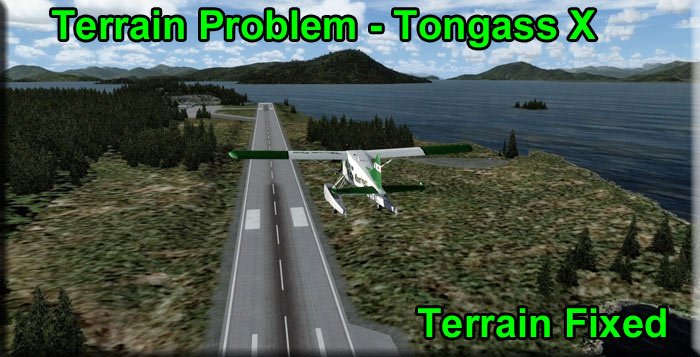
The scenery at Wrangell should look like this:
Holger Sandmann has given us a "fix" for this if if happens to you. First, download the text file you will need HERE. There are instructions in this package for how to fix the problem. Read the instructions for details. But basically, Holger gives you a "text block" that is to be copied/pasted into your terrain.cfg. You then must renumber the entries and change the default count (all this is explained in the document). This will fix the problem. NOTAM: Also BE SURE you have your mesh set on 5 meters ... that can also cause problems similar to this. Check the mesh first, changing that setting may be all you need to do. NOTAM The ACTIVE cfg file locations:
|
Tongass X |
Tongass X - Discussion, Tips and Tricks Another "Must Have" scenery region is Tongass Fjords X by FSAddon. RTMM also develops scenery projects inside the reaches of this spectacular scenery area so this is highly recommended by RTMM. This is an addition to Microsoft's Flight Simulator X that will turn a large part of Southeast Alaska and northwestern British Columbia (some 80,000 square kilometers!) into the beautiful piece of nature that it really is! You get a flying environment that puts you in the pilot seat flying around some of the most stunning landscapes you may find in the real world. You not only get the ACTUAL coast lines, lakes, islands, roads, rivers and glaciers (!) installed on your FSX, but in addition some very talented people have added "things to see and things to find" for you in that rugged area of fjords, mountains, lakes and sea. Scenery File Library Placement In the scenery hierarchy in your scenery index for FSX, there are two files associated with Tongass Fjords:
These should be placed BELOW the ORBx Files. What is Tongass Fjords X? Tongass Fjords X is the completely rebuilt version for FSX of our previous Tongass Fjords success title. It again is a major cooperation between Holger Sandmann and Bill Womack, including the already legendary 'Sandmann Landscape' and also some true-to-life regional airports such as Sitka and Petersburg, the town of Petersburg and quite a few other settlements, airports, seaplane bases and harbors. As you will learn there is a plethora of things to see, discover, experience and visit !!! Tongass Fjords X is supported by the same team that brought you Misty Fjords and Tongass Fjords for FS2004, and it covers almost the same area as the previous Tongass Fjords. It is fully compatible with Ultimate Terrain right from the start, and also with most other FSX titles for the region that have been released up till now. With Tongass Fjords X we bring you a whole new FS world !!! Nope, we’re not exaggerating one little bit, as you will soon see after installing it. Tongass Fjords X really is what FSAddon.com Publishing is all about….. enhancing your immersion in the wonderful world of Flight Simulation. Tongass Fjords X will give you the feeling of ‘being there’ more than ANY other product currently on the market. Sure, sure, marketing speak, right!? We are convinced that you will agree with us after installing Tongass Fjords X and all its additional scenery and objects. All of the thousands of previous owners of Misty Fjords and Tongass Fjords will confirm and support this. You can purchase the program HERE |
Tongass X |
For Scenery Library Adjustment, I highly recommend the Lorbi Addon Organizer found HERE. 1. Copy the the Tongas X Higher Priority and Tongass X Lower Priority files in your P3D Scenery 2. Use Addon Organizer to add these to the scenery library and place them below the RTMM Scenery Libraries and just above the FTXAA_ORBIXLIBS entry. 3. Find the Terrain.cfg file located at PROGRAM DATA/Lockheed Martin/P3D V4 - make a backup of this 4. Go to this AVSIM FORUM THREAD and look at the bottom and you will find 40 "terrain.cfg" entries. Copy these and paste them to the bottom of the terrain.cfg file 5. Look at the last entry above your entries. Add "1" to its number to name the 1st Tongass X texture file. Renumber all of the new Tongass X entries in increasing order (adding 1 to each one). 6. Look at the last texture number you have for your last Tongass X entry. Now go to the top of the folder to the DEFAULT TEXTURE COUNT ... change that number to the last Tongass X entry number. 7. Next you must enter the elevation correction. Go to your P3D 3 Scenery/World/Scenery ... look for these files: AFT_FSX_TF_CAB5_elevation adjustment AFT_FSX_TF_CBM5_elevation adjustment AFT_FSX_TF_CBW4_elevation adjustment AFT_FSX_TF_PAFE_elevation adjustment AFT_FSX_TF_PAKW_elevation adjustment AFT_FSX_TF_PAPG_elevation adjustment AFT_FSX_TF_PASI_elevation adjustment AFT_FSX_TF_PAWG_elevation adjustment Copy these and paste them into your P3D V4 Scenery/World/Scenery folder. 8. Before running TFX, an update needs to be made for most of the Tongass AI models or you will experience CTDs.RTMM has identified four TFX AI Airplanes and one Rotorcraft that are not compatible with P3Dv4 now that Lockheed Martin has removed the SimObjects backwards compatibility for AI models constructed under the FS8 and FS9 SDKs. This update converts these models to be FSX models so that they will work properly in P3Dv4. The models converted are the two DHC-3s, the DHC-6, the Dash 7 and the Bell 206L. (If you don't have these models in your SimObjects folder then this update cannot be made. Your TFX installation is not complete and you will be missing most of the wonderful TFX AI). (By Rod Jackson) Here is Rod's update folder for doing this. |
| Back to Top | |


| U | |
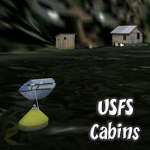
USFS CABINS
|
You must have PFJ installed and also the Service Pack 1 These cabins, built by Bill Womack and placed perfectly in the PFJ scenery by Holger Sandmann are the real location and styles of the actual USFS Cabins. You can read more about them on the USFS Website. All of the USFS Cabins are listed on "The Cabins" page. You will see two sets of gps coordinates there. The first (to the left) is for the location of the actual structure, the second (to the right) is for the "Mooring (start) Point". If you want to locate the cabin exactly, use the "structure location," if you want to start a flight at a cabin, selecting the Mooring Start Point will put you at the mooring buoy for that cabin. To do either, while in FSX, you select "M" for the map. You put the Latitude and Longitude into the appropriate places (nothing else needs to be filled in) and hit "OK". The program takes you to that exact location. At the top of the page is a legend that explains the letters that are beside the location. You can click on the location name and you will go to a full description of the cabin provided by the United States Forest Service. Clicking on "M" there gives you their map. Notice the *** ... this means the lake is frozen in winter, so do not use a float plane when starting there in winter. If you are using FSDiscover! ... you can get the latest "dat file" that adds the cabins to FSDiscover! HERE. This is always available in the Map Room at the top of the page as is the Plan-G update and the RTTM Dat file for all other locations in the area. |
| Back to Top | |
| V | |
|
Vehicle Fix for P3D |
|
|
ORBX Vector and ORBX Global |
Discussion: Without GLOBAL and VECTOR and flying OUTSIDE of ORBX full fat regions you are not going to have scenery that comes close to looking like the promotional screen shots you see at ORBX. If you content to fly within ORBX full regions only than you will enjoy very realistic scenery, mesh, shorelines etc. Without GLOBAL and VECTOR your scenery will essentially be default and in a word SUK!
ORBX Global: (From the VECTOR user's manual) <= Link to download site • Replaces all the default landclass textures located in \Scenery\World\Texture with custom Orbx FTX textures • Installs FTX Central and other supporting apps into the \ORBX folder. FTX Central and these other apps help manage all Orbx addons including FTXG, FTX Regions and FTX Airports and we’ll cover them in more detail later • Adds 3D lights to all vector main roads all over the world. These can be turned on and off using FTX Central (see page • Makes corrections to the base landclass for some parts of the world, particularly in SE Asia • Adds 3D lights to all textures all over the world. These can be turned off and on during dawn/day/dusk using the FTX Lights Day and FTX Lights Night apps ORBX VECTOR (From the VECTOR user's manual) . <== Link to download site • Accurate coastlines, rivers, lakes and other water bodies. Vector uses new shoreline and beach textures to add more realism which provides a more integrated and natural appearance • Motorways, freeways, main arterials roads, roundabouts – all with moving vehicle traffic and specific underlays and skirtings to blend in better with landclass textures • Golf courses, city parks and forests • Extrusion bridges and tunnel entrances • Tram lines where applicable, railway lines and railway yards • Power lines using default models • Corrected airport elevations for all default airports • Ports and docks concrete textures Plus VECTOR does require FTX Global to function properly. |
| Back to Top | |
| W | |
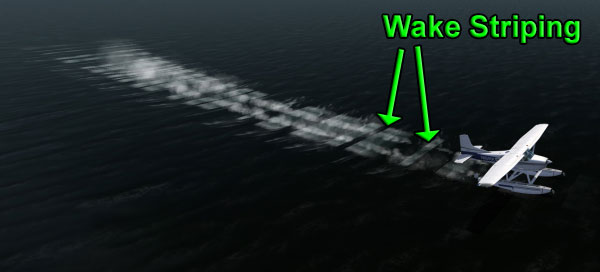
Wake Striping |
Waking "striping" is caused by the wake texture not staying in contact with the undulating wave surface. Solution: To get rid of the "striping" effect ... In Aircraft.cfg under "Effects/Wake" add this: always_use_avg_surface=1 This will have to be added to any wake where this is encountered including AI Ships. |
|
Wing Leveler |
Dave Westbury has created a Flight Simulator Force Feedback and Wing Leveler Utility that is a great addon for bush flying. In Misty Fjords, if you are flying the real weather, you'll find the ceiling is at about 300-500 feet most of the time. Going "up" through the clouds is no problem, but coming down ... your odds of finding the side of a mountain rather than a nice clear space are pretty high! The "real" pilots up there just stay below the clouds and wind their way through Misty Fjords, VFR. For us, setting the autopilot at about 200 feet and being able to "turn" is a real help. (FSX comes with the "flight leveler on the "ON" position" meaning if you set the altitude you cannot turn left or right. This program gets rid of that in a macro for all of your aircraft. You can download the program HERE. Note: You can also do this manually every time you turn on the autopilot by hitting CTRL-V. But the Wing Leveler program takes care of that for you. |
| Back to Top | |

| X | |
| Back to Top | |
| Y | |
| Back to Top | |
| Z | |
| Back to Top | |