button
 
NOTAM: Use CTRL-F to Search this Page (Windows)
Index of Tables
Back to Top
Helipad Elevation Problem/Solution
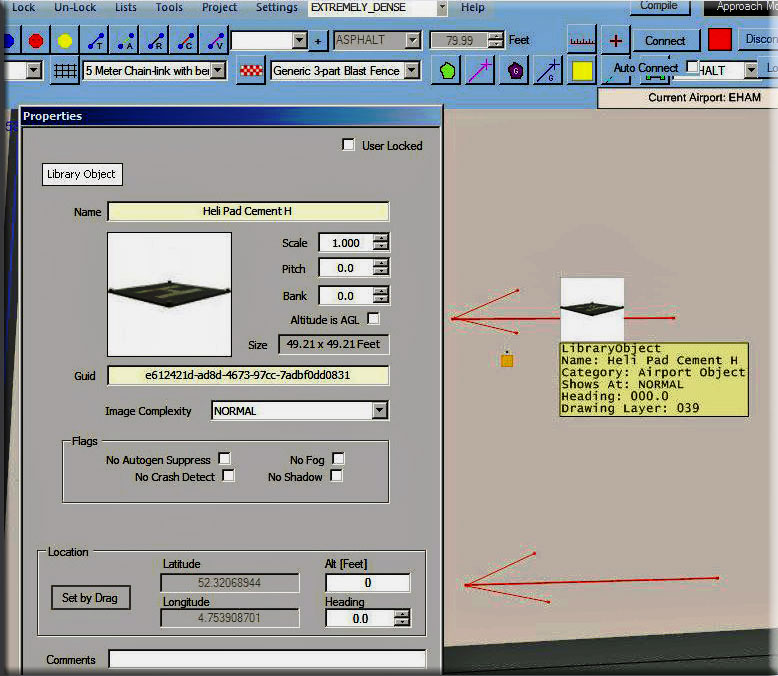
Helipad Elevation Problem - by Steve Weinkamer

Problem: Using ADE, placing a helipad at a radically different location/altitude, can cause the "start" for the aircraft to be below the helipad (at ground level).

METHOD #1

Place a small flatten under the pile of rocks object and then placed the helipad object just resting on the flatten, which is 99% hidden by the rock object. Also adjusted the helipad’s starting altitude in ADE dialog (I have the ProKey addition which makes this pretty easy. Can also be accomplished by hand editing the airport/helipad 4’s xml properties in notepad.)

METHOD #2

  • By default, scenery objects clamp to the ground (AGL).
  • Make sure you select one of the scenery object heli pads from the "airport-Objects.bgl.
  • In the property window, uncheck the Altitude is AGL. Change the altitude to match the height of the building, plus the amount of feet above sea level the building is sitting at. example, if the building is 80 feet tall and the MSL is 500 ftl, then set the altitude to 580 feet.

Back to Top
CAB Folder Revisions
Changing the contents of a "cab" file ... (by Rod Jackson)

The process is to double click on the .cab file.   That will open the folder set.  You can then extract everything to another folder...let's call it "Revision" or it can be the same name as the .cab file you are revising.

Once you have a folder named Revision (or whatever) with all of the files from the original cabinet...you can delete them, replace them or whatever. When you have the new "Revision" folder as you want it, then go to the SimObject SDK folder inside the Prepar3D SDK.  In that folder should be a folder named Cabdir SDK.   There is a utility called CabDir.exe in that folder.    Just drag your "Revision" folder over the CabDir.exe and let go and....voila....the files have been repackaged into a new file called Revision.cab.   If you are replacing a cab file....then obviously you would use the name of the cab folder you are recreating and not the word "Revision". 

Back to Top
IS3 - Objects Position Moving with Altitude

Problem: Objects "shifting" away from positioning when placing objects at altitude:

Be very careful about using default FSX or default P3D objects at any elevations over 900 feet where the shift gets very noticeable. They are the ones that are shifting. (See below.) Our developers should only place FSXP3D Library objects when working above 900 feet altitude or use default FSX or P3D objects placed in scenery where object shift wouldn't matter. (A boat in the water, or a random animal placed in the forest for example.) Also, if you look at the animation below you'll see that the airplanes in the hangar and the one in the in the front shift. Those kinds of shifts probably don't really matter in this scene.

If our developers do place non FSXP3D objects above 900 feet, there is a high risk that they will shift more and more as the altitude gets higher than 900 feet.  Big Creek Lodge, for example, is over 4000 feet and the scene we tested contained quite a few objects that did not come from the FSXP3D libraries but instead came from the default FSX or P3D objects. It is those objects that shift. 

Here is what the "shift" looks like with IS3 active when the objects were placed and then what the scene looks like after reloading FSX or P3D AND without IS3 in memory. This scenery location is at 4200 feet, so the shift is very noticeable.

Notice the red airplane in the hangar. It is "centered" in the hangar when IS3 is "on" and you are placing objects. But when IS3 is "off," objects shift to the left (in this case).

To test an object at ground level to tell if it will move at altitude note this: In most cases it is easy to test an object without even going to altitude.   Tilt it in IS3 and then after you restart P3D see if it holds its tilt.  If it does, then DCB was off when that object was created or converted.  If it loses its tilt then DCB was on when that object was created.  Of course, all the objects in the FSXP3D library should hold their tilt. (Rod Jackson)


Back to Top
ADE - Adding "invisible" airport under one made with SBuilderX

I make my runways with SbuilderX. But to transform this into a working airport, I need to create an airport with ADE. When doing so, to keep the runway and taxiways from showing, you have to:

  1. Top Bar, Click on Edit
  2. Select taxiway or runway
  3. Right Click select edit
  4. Change the WIDTH of the runway or taxiway to zero.
  5. Compile

NOTAM: It is possible for the concrete taxiways to show up in FSX even though they are not showing up in P3D, so do this as a final check if you are designing with P3D.

Back to Top
Four Digit Latitude/Longitude
Four Digit Latitude and Longitude - By Rod Jackson

Problem: The default number of digits on the "minutes" for lat/long is two. When you are placing an aircraft beside a dock or a windsock in a critical place, this is not accurate enough.

Solution: Go into the Prepar3d.cfg or FSX.cfg files and add this under [MAIN]:

[Main]
FractionalLatLonDigits=4

Back to Top
River/Stream Addition
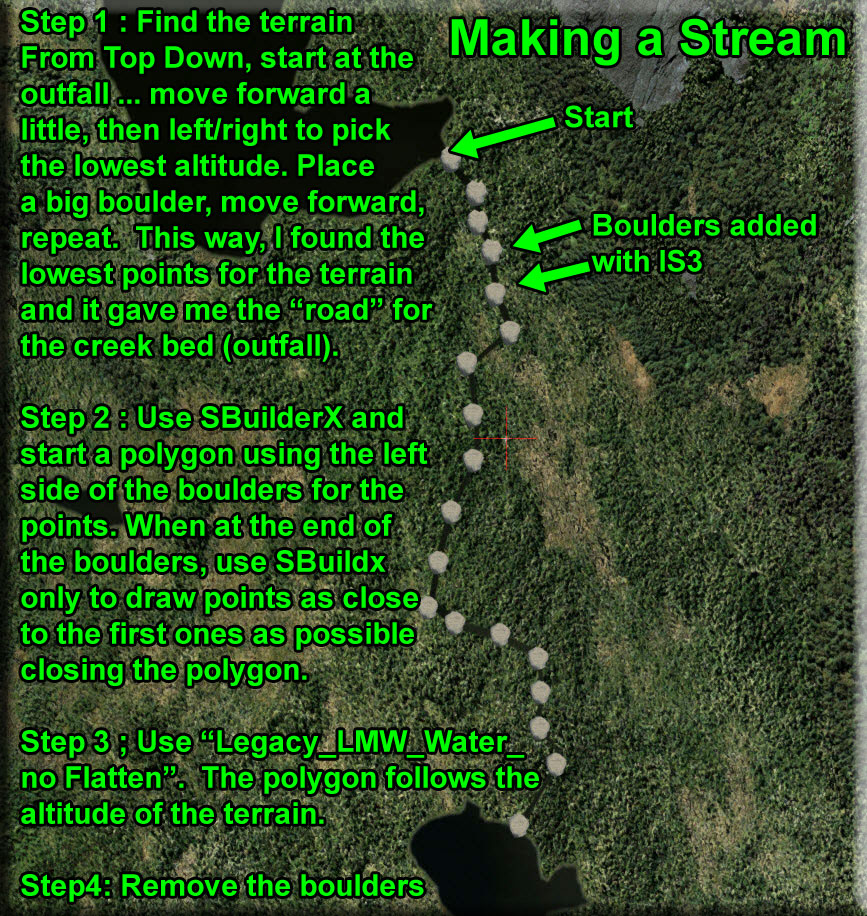
Making a River come down a mountainside - (Following the terrain without having to put altitude into each of the points.

example

For a realistic looking "stream", edit the polygon to make it extremely narrow, this keeps you from having a blue "gash" across the scenery, it is also easier to "landscape" blocking out the sharp turns.

Back to Top
Long/Narrow Ground Polygons - Transmission Lines (SBuildX)
Making Long/Narrow ground polygons (example: transmission lines) - Rod Jackson

Okay, here is my technique for making long narrow SBX polys that weave and so on (creeks, rivers, power line cut blocks etc.):

1. Go to the location you want in FSX/P3D and show aircraft in SBX. Then show background.

2. Draw a line in SBX clicking along the way and following the route according to the GE overlay approximating where you want the long narrow box to fall. Sometimes you are best doing 2 or 3 lines if it is a long run. Make sure to save several times as SBX like to fail on long lines.

3. Change width of line (s) to 1, 2, 3 for stream. 3, 4, or 5 for substantial creek. Use at least 15 for powerline cut. Note: Multiple lines let you have a creek that's narrower closer to source.

4. If you want to check to see if line looks right in FSX/P3D, change property to a shoreline and you can then see the line in FSX/P3D.

5. Adjust line as necessary to be where you want it.... Don't forget to save a lot....

6. When the lines(s) are where you want save and then right click line and choose smooth and then click on smooth button to smooth out all curves (may not want to do this on a power line cut) but definitely for streams/creeks/rivers. This process adds many points to the line and can be run more than once to super smooth the curves! Save, Save, Save.

7. When all looks great it is time to turn the lines into polys. Right click a line and choose "Convert to Poly" and voila, you have a very long narrow poly with all the smooth curves. Then just change the properties to non flatten water (FTX version) or, if power line cut, something like LC63 which is what I used for Thayer. Show a little rock, no trees and matches the Alaskan woods pretty well.

8. You can then move the ends of the polys , if you had multiple lines, to overlap each other so it looks like one long poly in FSX/P3D.

Back to Top
Adding a Path with (SBuilderX)

Adding Shorelines to Water Polygons

Using SBuildX ...

  1. Use the LINE tool
  2. Lay out the path
  3. Use "Dirt 1 Lane, undivided median" for the property

This follows the terrain.

Back to Top
Water "Flatten" with SBuilderX

Flattening Water Anomalies with SBuilderX

Sometimes we encounter "bulges" in the water or elevation problems where a river comes out into a lake .. a 2-3 meter drop or rise. These can be flattened using slanted polygons.

For anything OUTSIDE of ORBX, for the polygon property, use AB-FLATTEN

For anything inside ORBX, use the special textures (See This) : FTX-PNW_LandWaterMask_Water_Lake

Back to Top
Adding Shorelines (SbuilderX)

Adding Shorelines to Water Polygons

Using SBuildX ...

  1. Once you have your "water" polygon added
  2. Click on the LINE option
  3. Add a line along the edge of the polygon where you want a shoreline
  4. When finished with that shoreline, click escape.
    1. If you get a wide blue area, click on properties and set the WIDTH to 1 or 2
  5. Click on the line and select properties ... use "Shorelines Generic Canal Channel"
  6. Click on the "pointer" potion on the top menu and click on Select All
  7. Compile it and place it in your location folder
Back to Top
ORBX Polygons Needed - (SbuildX)

The ORBX Polygons Needed

To be able to change things with the ORBX software packages, you need a special group of new polygons that are in "polys.txt". The file should be positioned at SBuilderX/Tools. First, copy and save the polys.txt that comes with SBuilder X. Put this new Polys.txt into that position.

Polys.txt

When you want to flatten a "water anomaly" (Tsunami) often encountered in ORBX software, apply the property:

FTX_PNW_LandWaterMask_Water_Ocean

This will flatten a water area.

Back to Top
Season Switcher

Season Switcher Instructions - By Rod Jackson
RTMM SEASON SWITCHER NOTES FOR SCENERY DEVELOPERS ONLY
:

In order for your scenery to take advantage of the RTMM Season Switcher, your seasonal file .bgl's need to follow the following file name convention:

 *_rtmm_<season name>.bgl or .off

The * can be replaced by any number of characters/symbols to identify your seasonal file.  The <season name> parameter needs to be winter, spring, summer, fall or noseason.  "Noseason" contains the extra objects you want the user to see if the user decides not to run the RTMM Season Switcher.  These objects should look reasonably good in all seasons.  Therefore, all of your seasonal files should start out with the .off extension except for the "noseason" file which would have a .bgl extension. 

For example:     tiny_town_rtmm_spring.off       or    tiny_town_rtmm_noseason.bgl

 You need to have all four seasons represented as well as a "noseason" file, even if two or more of the files are the same content (e.g. your spring and summer look is the same).  For example, if you are doing extra trees in the scenery location (which in real life would be there all year round in some form) and your spring and summer trees are the same, then you need to have two files of the same thing with the different season names of spring and summer..  Otherwise, if you just had spring then in summer there would be no trees showing at all.  In your release package, all the seasonal files should be set to .off except the "noseason" version which should be set to .bgl  Then, if someone just doesn't use the switcher, they will still get the default "noseason" version displayed.

The seasonal .bgl files would normally be contained inside the scenery file of your package where your other scenery .bgl's are also located.

The only time you don't need all five seasonal files represented is if you are using a seasonal file to just add something that isn't there when other seasons are active.  For example, a winter file that adds snowdrifts and a summer file that adds high grass but no adds are made for spring or fall.  In that case, I would set the add on seasonal files to .off  so that one doesn't load in the wrong season if the user never uses the RTMM Season Switcher.

 Rod

Back to Top
BGL Compiler Shortcut

  1. Make sure you have the "SDK" kit for your simulator. There is one for FSX and one for P3D.
  2. For FSX: http://www.softpedia.com/get/Programming/SDK-DDK/Microsoft-Flight-Simulator-X-SDK.shtml
  3. For Prepar3D: http://www.prepar3d.com/wp-content/plugins/download-monitor/download.php?id=144
  4. Find a file named "bglcomp.exe" and create a shortcut to it and put it onto your desktop.
  5. Once you make an xml file (from examples below), you drop the created XML file onto the top of the shortcut ... a .bgl file is generated from this action.
Back to Top
Fuel Trigger - (XML)
Fuel Trigger Creation

For a 50 Meter Trigger (radius)

<?xml version="1.0"?>
<FSData
version="9.0"
xmlns:xsi="http://www.w3.org/2001/XMLSchema-instance"
xsi:noNamespaceSchemaLocation="bglcomp.xsd">

<SceneryObject
lat="N55 2.24"
lon="W131 34.26"
alt="0.0F"
altitudeIsAgl="TRUE"
pitch="0"
bank="0"
heading="315.00"
imageComplexity="VERY_SPARSE">
<Trigger
type="REFUEL_REPAIR"
triggerHeight="0.0F">
<Fuel
type="100"
availability="YES"/>
<Fuel
type="JETA"
availability="YES"/>
<Vertex
biasX="-50.0F"
biasZ="-50.0F"/>
<Vertex
biasX="-50.0F"
biasZ="50.0F"/>
<Vertex
biasX="50.0F"
biasZ="50.0F"/>
<Vertex
biasX="50.0F"
biasZ="-50.0F"/>
</Trigger>
</SceneryObject>

</FSData>

  1. Copy the above code into a text reader (Notepad, etc)
  2. Change the "lat=" and "long=" to the latitude and longitude where you want the fuel trigger.
  3. Save the new code changing .txt to .xml
  4. Drop the new XML file onto the BGL Compiler Shortcut
  5. Place the resulting bgl file into the scenery location where you want the new fuel trigger.

NOTAM: If you want to SEE the fuel trigger - in the Prepar3d.cfg file (users/doug/apps/roaming/lockheed martin/prepar3d.cfg ... go to the scenery area and turn the ShowTriggers=1 on and off by putting // ahead of it or not. This gives a big green square so you can see if the fuel trigger is added and its location.

Back to Top
Way Points Generation (XML)

Way point Generation (that will show on the GPS)

<?xml version="1.0" encoding="ISO-8859-1"?>
<FSData version="9.0"
xmlns:xsi='http://www.w3.org/2001/XMLSchema-instance' xsi:noNamespaceSchemaLocation="bglcomp.xsd" >
<Waypoint
lat="N58 18.7707"
lon="W133 47.5264"
waypointType="NAMED"
magvar="17.0"
waypointRegion="PA"
waypointIdent="EXXXX">
</Waypoint>
</FSData>

  1. Copy the above code into a text program (notepad, etc)
  2. In the above XML code, replace the way point "lat=" and "lon=" with the latitude and longitude of the way point.
  3. Give the way point a name by changing "waypointIdent="
  4. Save the text adding ".xml" instead of ".txt"
  5. Drop the saved XML file onto the BGL Compiler Shortcut, (the compiler will create a .bgl file for it), place the resulting .bgl file into your location folder where you want the way point to show up.
Back to Top
Libraries RTMM Developers can Use - Permitted Libraries and BGLs Only

As we ask others to respect the use of our object libraries, we also must respect other people's libraries that have not given us permission for our developers to use in RTMM Locations. For a new developer for RTMM, here is a list of the approved object libraries ... these are the only objects an RTMM developer is permitted to use in creating an RTMM scenery location. Note that "Groups" are in BOLD with two dots after them: example "FSXP3D.." So anything with that PREFIX is allowed.

============================================================

airport_objects.bgl

animals.bgl

APP_Snett_avalanche.bgl

autogen.bgl

bridges.bgl

buildings.bgl

fillerobjects.bgl

FSXP3D..

FSXP..

gameobjects.bgl

generic.bgl

hazards.bgl

landmark.bgl

library_FSX_..

missionobjects.bgl

Missions_RedBull_SF.bgl

Prepar3D_filler.bgl

roofs.BGL

testarea.bgl

vegetation.bgl

vegetation_fsxrtm.bgl

Vehicles_Aircraft.bgl

vehicles_airport.bgl

vehicles_land.bgl

vehicles_landFSXP3D.BGL

vehicles_water.bgl

waterobjects.bgl

Back to Top
Windsock Creation (XML)
Windsock Creation

  1. Select the colors you want below, copy that code into a text reader (notepad, etc)
  2. Go to Compile Instructions

Orange Sock, Brown Pole

<?xml version="1.0"?>
<FSData
version="9.0"
xmlns:xsi='http://www.w3.org/2001/XMLSchema-instance'
xsi:noNamespaceSchemaLocation="bglcomp.xsd" >

<SceneryObject
lat="N55 15.74"
lon="W131 46.23"
alt="0.0M"
altitudeIsAgl="TRUE"
pitch="0"
bank="0"
heading="0"
imageComplexity="VERY_SPARSE">

<Windsock
poleHeight="6.0"
sockLength="2.5"
lighted="TRUE">
<PoleColor red="102" green="51" blue="0"/>
<SockColor red="255" green="128" blue="128"/>
</Windsock>
</SceneryObject>

</FSData>

Green Sock Brown Pole

<?xml version="1.0"?>
<FSData
version="9.0"
xmlns:xsi='http://www.w3.org/2001/XMLSchema-instance'
xsi:noNamespaceSchemaLocation="bglcomp.xsd" >

<SceneryObject
lat="N55 15.74"
lon="W131 46.23"
alt="0.0M"
altitudeIsAgl="TRUE"
pitch="0"
bank="0"
heading="0"
imageComplexity="VERY_SPARSE">

<Windsock
poleHeight="6.0"
sockLength="2.5"
lighted="TRUE">
<PoleColor red="102" green="51" blue="0"/>
<SockColor red="0" green="176" blue="0" />
</Windsock>
</SceneryObject>

</FSData>

Orange Sock, Gray Pole

<?xml version="1.0"?>
<FSData
version="9.0"
xmlns:xsi='http://www.w3.org/2001/XMLSchema-instance'
xsi:noNamespaceSchemaLocation="bglcomp.xsd" >

<SceneryObject
lat="N55 15.74"
lon="W131 46.23"
alt="0.0M"
altitudeIsAgl="TRUE"
pitch="0"
bank="0"
heading="0"
imageComplexity="VERY_SPARSE">

<Windsock
poleHeight="6.0"
sockLength="2.5"
lighted="TRUE">
<PoleColor red="48" green="48" blue="48"/>
<SockColor red="255" green="128" blue="128"/>
</Windsock>
</SceneryObject>

</FSData>

Red Sock, Brown Pole

<?xml version="1.0"?>
<FSData
version="9.0"
xmlns:xsi='http://www.w3.org/2001/XMLSchema-instance'
xsi:noNamespaceSchemaLocation="bglcomp.xsd" >

<SceneryObject
lat="N55 15.74"
lon="W131 46.23"
alt="0.0M"
altitudeIsAgl="TRUE"
pitch="0"
bank="0"
heading="0"
imageComplexity="VERY_SPARSE">

<Windsock
poleHeight="6.0"
sockLength="2.5"
lighted="TRUE">
<PoleColor red="102" green="51" blue="0"/>
<SockColor red="255" green="0" blue="0"/>
</Windsock>
</SceneryObject>

</FSData>

Red Sock, White Pole

<?xml version="1.0"?>
<FSData
version="9.0"
xmlns:xsi='http://www.w3.org/2001/XMLSchema-instance'
xsi:noNamespaceSchemaLocation="bglcomp.xsd" >

<SceneryObject
lat="n56 28.4272"
lon="W132 22.4594"
alt="0.0M"
altitudeIsAgl="TRUE"
pitch="0"
bank="0"
heading="0"
imageComplexity="VERY_SPARSE">

<Windsock
poleHeight="6.0"
sockLength="2.5"
lighted="TRUE">
<PoleColor red="255" green="255" blue="255"/>
<SockColor red="255" green="0" blue="0"/>
</Windsock>
</SceneryObject>

</FSData>

Yellow Sock, Brown Pole

<?xml version="1.0"?>
<FSData
version="9.0"
xmlns:xsi='http://www.w3.org/2001/XMLSchema-instance'
xsi:noNamespaceSchemaLocation="bglcomp.xsd" >

<SceneryObject
lat="N55 15.74"
lon="W131 46.23"
alt="0.0M"
altitudeIsAgl="TRUE"
pitch="0"
bank="0"
heading="0"
imageComplexity="VERY_SPARSE">

<Windsock
poleHeight="6.0"
sockLength="2.5"
lighted="TRUE">
<PoleColor red="102" green="51" blue="0"/>
<SockColor red="255" green="242" blue="0"/>
</Windsock>
</SceneryObject>

</FSData>

Compilation Instructions

  1. Select color set from the above xml files.
  2. Copy the above code into a text reader (Notepad, etc)
  3. Change the "lat=" and "lon=" to the exact coordinates where you want to place the windsock. (Recommend using the 4 digit minutes (See "Four Digit Latitude and Longitude").
  4. Save the text file using ".xml" instead of ".txt"
  5. Drop the XML file onto the BGL Creation Shortcut
  6. Place the resulting BGL into the scenery location folder where you are adding the windsock.
Back to Top
Flight Planning Program - VFR Flight Planner

A flight planning program is a necessary tool for the RTMM location designer. As we say at RTMM, the JOURNEY is the key, that's why we highlight "Here2There". Scenery locations are great, but getting to and from them is what flight simming is all about.

We recommend VFR Flight planner. This is a freeware program that you can find at: http://vfrflight.org/en/index.html

1. When you first install the program, you must retrieve all of your simulator's locations. This takes a while but is only done one time.

Note: If you re-download the program for an updated copy in the future, you can skip this step by copying the "db" folder from your old folder and pasting it into your newly downloaded folder ... all of the data will be there. This takes about a minute!

2. Next, you want to put in all of the CSV files for Misty Moorings that Dieter Linde has made for us. You can find these on the Misty's Place page under "Dieter's Corner". Download the RTMM data sets there.

3. Import the RTMM CSV files into VFR Flight Planner. Now all RTMM locations will show up on the map and you will be able to tell if there is something in the are you are already planning to use.

4. Use VFR Flight Planner to make the map you will need for a vfr flight TO your location FROM a nearby airport. All flight plans must start at an airport. (If there is not one nearby, then you should discuss the possible need for a new airport for the area).

If you have questions about installation, there are YouTube videos at the site that explain every phase of this. Also, you can contact Doug or Rod on the forum and ask questions about it. We would be happy to help you.

Back to Top
Library Object Rules at RTMM

We welcome scenery designers who wish to create their own custom objects for their scenery projects. All of RTMM’s FSXP3D libraries have been certified to be fully compatible for use with FSX, FSX DX10, and all current versions of P3D. In addition there are no known issues with FSX-SE.

In order to assure that any objects and their related textures conform to RTMM standards, all new objects and textures under consideration for use in RTMM scenery projects must be submitted and approved of in advance by the object librarian. RTMM uses a proprietary system that assures full compatibility with each simming platform. All object designers must unconditionally agree, in writing, to allow RTMM staff to make necessary changes within each model and recompile as necessary in order to assure full compliance with RTMM standards. This agreement also extends to related texture files and texture sheets.

Under most conditions all models will be required to have night textures attached to them as well. All objects must be 3D objects; we will not accept any 2D objects. Please contact the RTMM object librarian for further information regarding more detailed and specific guidelines and requirements. Email contact@mistymoorings.com and your questions and submission will be forwarded to the proper individual.

While object designers always own and retain the rights to their work, designers must also agree, in writing, to grant RTMM scenery designers the free and unrestricted use of their objects and textures within any future RTMM scenery projects, in perpetuity. After final approval, all custom objects and textures will be incorporated into a general RTMM library for download. We will no longer release scenery with object libraries placed inside of scenery folders. Please contact the RTMM object librarian for further information and guidelines.

RTMM will never allow designers’ intellectual property to be posted or used by any outside organizations or website, although the designer may independently allow such usage. As a courtesy, and in order to protect all parties, please notify RTMM if such outside permission is granted so that we are aware of your intentions.

RTMM reserves the right to reject objects that don’t meet our minimum standards of quality and aesthetics.

Back to Top
XML for SMOKE Object

This was submitted by Mike Broemme. Basically, you add latitude/longitude (in decimal degrees) and elevation. This is used when you want to place smoke coming out of a chimney on a cabin that has no smoke included in the object.

Please do not place the smoke effect over the reduced cabin again.
Otherwise, there may be problems after the next P3D update.

Better to stick to the SDK (http://www.prepar3d.com/SDKv4/LearningCenter.php), then you have the work of adjusting the smoke effects only once.

It's not that difficult either.

The whole thing goes like this (using the example of Yes_Bay_Lodge) ...

Step 1
- remove the reduced Cabin for the smoke effect from the Scenery-BGL (PLC_78K_Yes_Bay_Lodge.bgl) and save it again ...

Step 2
- create an XML file for the placement of the smoke effect and give it a descriptive name (here "FX_78K_Yes_Bay_Lodge_Smoke.xml") ...

Here is the XML code for Yes_Bay_Lodge:

<?xml version="1.0" encoding="ISO-8859-1"?>
<FSData
version="9.0"
xmlns:xsi="http://www.w3.org/2001/XMLSchema-instance"
xsi:noNamespaceSchemaLocation="bglcomp.xsd">
<SceneryObject
lat="55.9161722660065"
lon="-131.797451376915"
alt="42.999F"
altitudeIsAgl="TRUE"
pitch="0"
bank="0"
heading="0"
imageComplexity="NORMAL">
<Effect
effectName="fx_ChimneySmoke"
effectParams=""/>
</SceneryObject>
<SceneryObject
lat="55.9162101522088"
lon="-131.797293126583"
alt="48.999F"
altitudeIsAgl="TRUE"
pitch="0"
bank="0"
heading="0"
imageComplexity="NORMAL">
<Effect
effectName="fx_ChimneySmoke"
effectParams=""/>
</SceneryObject>
</FSData>

•lat=  The latitude where you want to place the effect.  This is in decimal degrees.
•lon=  The longitude where you want to place the effect.  This is in decimal degrees.
•alt=  The altitude at which you want the effect to spawn (AGL in feet).

The XML code can also be used for other sceneries, but it must be adapted accordingly.

Step 3
- Compile the created XML file into a BGL file...

To compile the XML file I use the program "Xml2Bgl" from here (http://www.scruffyduck.org/xml2bgl/4584282782)...

Move the created BGL file (in this case "FX_78K_Yes_Bay_Lodge_Smoke.bgl") into the Scenery folder of Yes_Bay_Lodge.


Then start the P3D and assess the result.


Back to Top
Add Subject
Blank Table - Add Text here
Back to Top